From Prototype to Production: How to Scale from 1 Piece to 10,000
By Adil, Managing Director at AMN Engineering · · 8 min read

Every manufactured product starts as a single prototype. The challenge is getting from that first piece to reliable, cost effective production at volume. This guide walks through the four stages of scaling from 1 piece to 10,000+, what changes at each stage, how pricing evolves, and the mistakes that cost companies thousands of dollars during scale up.
We handle this transition daily at AMN Engineering. A client sends a drawing for a single prototype, we make it, they test it, they order 50, then 500, then 5,000. Understanding this process helps you plan better and spend less.
The Four Stages of Scaling
| Stage | Quantity | Purpose | Per Unit Cost |
|---|---|---|---|
| Prototype | 1 to 10 pcs | Prove the design works | Highest |
| Pilot Batch | 10 to 100 pcs | Test process and market | High |
| Low Volume | 100 to 1,000 pcs | Initial production, real orders | Moderate |
| Full Production | 1,000 to 10,000+ | Established demand, optimized | Lowest |
Stage 1: Prototype (1 to 10 Pieces)
The goal of a prototype is to prove the design works. Nothing else matters at this stage. You are testing form, fit, and function.
What to Expect
Cost per unit will be highest. The manufacturer sets up the machine, programs the tool paths, and runs your part. All that setup time is spread across just 1 to 10 pieces. A part that costs $5 each at 5,000 pieces might cost $50 each as a single prototype.
Lead time is fast. Most contract manufacturers can produce simple prototypes in 5 to 10 working days because there is no tooling to make.
Material may be flexible. If your production material is expensive or hard to source in small quantities, the manufacturer may suggest a similar, more available grade for the prototype. This is fine if you are testing shape and fit, not material properties.
What You Should Do
- Send a clear drawing with all critical dimensions
- Specify the production material (even if you use a substitute for the prototype)
- Measure and test the prototype thoroughly
- Note any design changes needed before ordering more
At AMN Engineering, we have no minimum order. We make single prototypes regularly for clients who are developing new products or replacing parts from discontinued suppliers.
Stage 2: Pilot Batch (10 to 100 Pieces)
The goal of a pilot batch is to test the manufacturing process and get early market feedback.
What Changes
You lock in the design. Any changes identified during prototyping should be incorporated before the pilot batch. Design changes after this stage become increasingly expensive.
The manufacturer optimizes the process. Cutting speeds, tool selection, fixture design, and sequence of operations are refined. This optimization reduces per unit cost for future orders.
Quality documentation begins. You should request material test certificates and inspection reports with the pilot batch. This establishes the quality baseline for production.
What You Should Do
- Finalize your design before ordering
- Order in the production material (not a substitute)
- Request full documentation (MTCs, inspection reports)
- Test pilot batch parts in real operating conditions
- Confirm the parts meet all functional requirements
Stage 3: Low Volume Production (100 to 1,000 Pieces)
The goal is real production for real customers.
What Changes
Per unit cost drops significantly. Setup time is now spread across hundreds of parts. The manufacturer has optimized the process. Material is purchased in larger quantities at better prices.
Fixtures and tooling may be justified. For parts that will be ordered repeatedly, the manufacturer may build dedicated fixtures that speed up setup and improve consistency. This is a one time cost that pays for itself over multiple orders.
Quality becomes routine. First article inspection on each batch, regular sampling during production, and standard documentation with every shipment.
What You Should Do
- Negotiate pricing for annual volume commitments
- Discuss dedicated fixtures or tooling that could reduce per unit cost
- Establish a regular ordering schedule if demand is predictable
- Build in 2 to 3 weeks of lead time for each order
Stage 4: Full Production (1,000 to 10,000+ Pieces)
The goal is maximum efficiency at sustained volume.
What Changes
Per unit cost is at its lowest. All setup costs are fully amortized. Material is purchased in bulk. The manufacturing process is fully optimized. Operators know the part by memory.
Dedicated tooling is standard. Fixtures, jigs, custom cutting tools, and inspection gauges are all built specifically for your part.
Scheduling becomes regular. Monthly or quarterly orders with predictable delivery dates. The manufacturer reserves capacity for your production runs.
How Pricing Changes with Volume
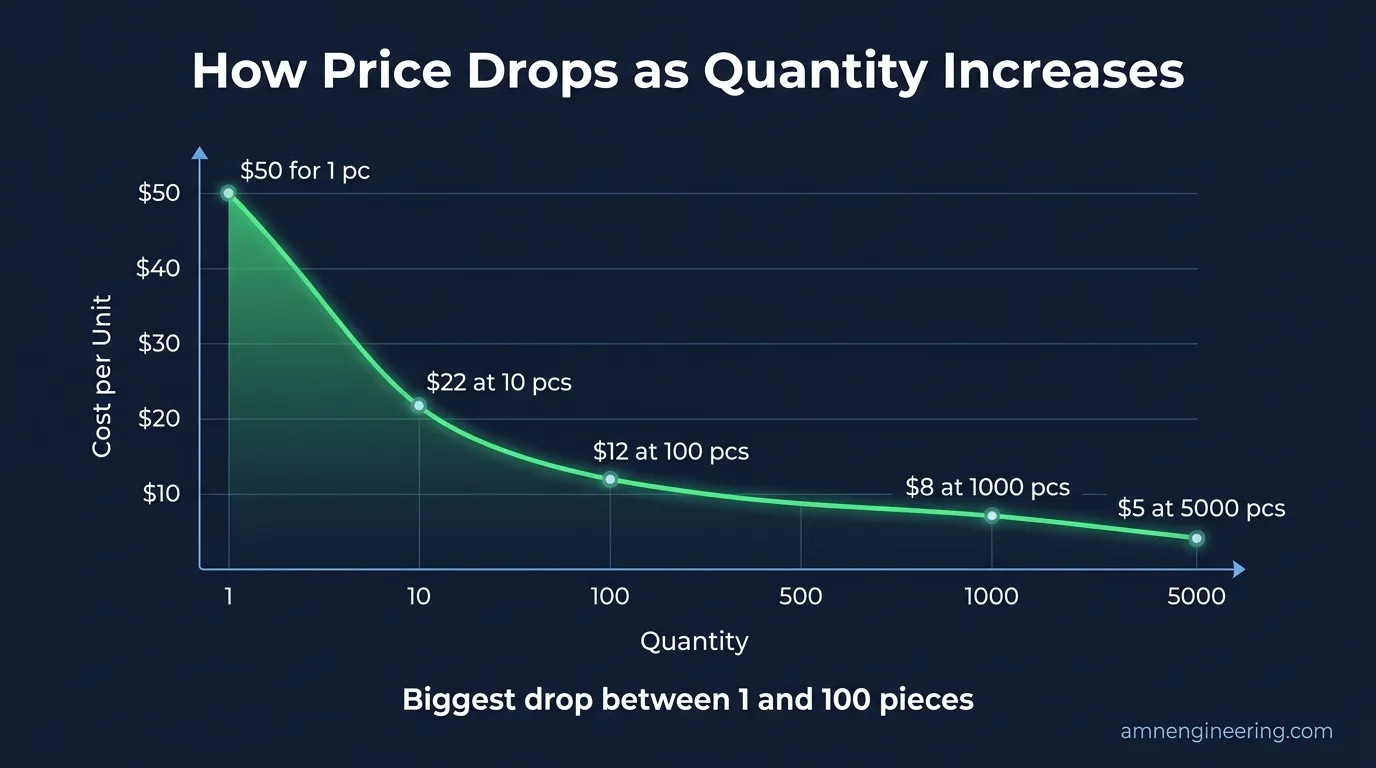
Here is a realistic example for a CNC machined shaft in EN8 steel:
| Quantity | Per Unit Cost | Why |
|---|---|---|
| 1 pc (prototype) | $50 | All setup cost on 1 part |
| 10 pcs (pilot) | $25 | Setup spread across 10 parts |
| 100 pcs | $12 | Optimized process, bulk material |
| 500 pcs | $8 | Dedicated fixture, faster cycle |
| 1,000 pcs | $6 | Full production efficiency |
| 5,000 pcs | $5 | Maximum optimization, bulk pricing |
The biggest price drop happens between 1 and 100 pieces. After 1,000, the curve flattens because the manufacturing is already fully optimized.
Common Mistakes When Scaling
Mistake 1: Changing the Design After the Pilot Batch
Every design change at the production stage means new programming, new fixtures, and potentially scrapped tooling. Finalize your design before committing to production volumes.
Mistake 2: Skipping the Pilot Batch
Going from 1 prototype directly to 1,000 production pieces is risky. The pilot batch catches manufacturing issues (tolerance stack ups, material variation, process inconsistencies) before they affect a large, expensive production run.
Mistake 3: Overspecifying Tolerances
Tight tolerances that made sense for a precision prototype may be unnecessary and expensive at volume. Review your drawing and relax tolerances on non critical dimensions before scaling up. This can reduce your per unit cost by 15 to 30 percent.
Mistake 4: Not Discussing Volume with the Manufacturer
If you plan to order 5,000 pieces annually, tell the manufacturer when you order your first 50. They may invest in tooling, negotiate better material prices, and reserve capacity, all of which reduce your per unit cost.
Frequently Asked Questions
A prototype typically costs 5 to 10 times more per unit than production quantities because all setup cost is absorbed by 1 part.
No. The pilot batch (10 to 100 pieces) catches manufacturing issues before they affect a large production run. It is inexpensive insurance.
When you expect to order 500+ pieces total (across multiple orders). The tooling cost is typically recovered within the first or second production batch.
Prototype: 1 to 2 weeks. Pilot: 2 to 3 weeks. First production run: 2 to 4 weeks. Total from first drawing to first production delivery: approximately 6 to 10 weeks.
You can, but it adds cost and time. Finalize your design before production. Minor dimensional changes are cheap. Major geometry changes may require new tooling and fixturing.